I finally got around to posting my reveal that I have been so excited to share.
I could never find the time to sit and get all the details out, hence the delay.
Remember the post I talked about my daughter-in-law Ashley?
If not, you can view it Here
She dreamt about me making her the pallet art frame that I had made for my home but did not want to ask me. So my son told me all about her dream and I got busy making one for her.
Well, my friends this is the reveal~~~~~~~~~~~~~~~~~~~~~~~~~
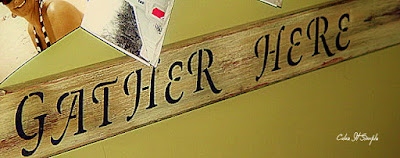
FAMILY, FRIENDS GATHER HERE
this lovely piece is the original one I made for myself...isn't it fun and big...makes a big statement and a great way to display pictures of family and friends.
I will walk you through the tutorial from the one I made for my daughter-in-law so you can find a pallet and make one for your home.
Who loves pallets?
 |
| google sorce |
Who likes to make cool stuff out of pallets?
I had some pallets in the back yard for some time.....
Trying to get those boards off was like trying to climb Mt Everest walking backwards in a blizzard blindfolded!!!!
 |
| google source |
alright! alright! I have never climbed Mt. Everest....... I'm just say'in....... it was really hard.
DO NOT TRY THIS AT HOME
at least not without Mr. handy to help you.
So after an hour of huffing and puffing, straining, banging and pulling and breaking boards I threw in the towel and called for reinforcements.
My partner in DIY crime or "do it for your wife" DIFYW.........
Mr. CIS was happy to help me, within 15 mins he had all the boards off the pallet with no breaking or cutting them wow he made it look so easy, but I asure you it is not....
Oh yeah, I save the rusty nails that come out when puling them apart to reuse I just like the old rusty look mo better. CAUTION when handeling these, use safety.
.......So now you have picked out the boards you want to use. I love pieces with holes and cracks it gives it so much character and chippy warmth!
You will need 5 boards for this project. I picked two wider boards when making Ashley's for the top and bottom and just regular size for the other 3. You will need your tape measure to get the board cut to the length and width you want your frame.
I did not want it to be exactly square shaped so I had him cut the length of the boards down and left the width alone. I think it was 40x32
Now he was getting my piece of palett art squared up and ready for nailing.
Ok got it squared with the metal squaring tool my hubs is using. I would have just eyeballed it but that it what I have him for right to help me do it the correct way.
Let the nailing begin!....now this beauty is starting to take on it's form.
From there I started the layering....I chose special walnut I already had from another project and began staining. I let that dry overnight since it was already evening ;)
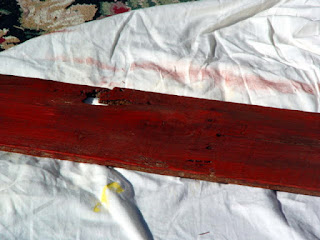
Then the next morning I started on it by adding a red paint over the stain
then the next layer of antique white
Now I took my sander and got to distressing it so that the red and the stain would peek through. Then with antiquing glaze brown and black I toned down the white with this process. And this is what we have.
The next step was to start the words....Family, Friends Gather here.
Now this part is time consuming but worth the out come. I dont have a fancy way to transfer but this way works better for me than stenciling. The one I made for myself I did use stencils and boy was that hard to get the letters perfectly straight and in line with each other.
So with the next one I used word to create and print out my font. Great thing about using your computer is the font selections are limitless. Get's me in trouble trying to decided on all the beautiful choices. Of course I take into consideration how easy it will be to trace and paint inside the lines.
It took me a few tries printing to get the font the correct size for the boards. The word family was printed on two sheets FAM....then ILY.
 I get my center line on the board and the paper then draw the center lines to mark. I measure the width of the largest letter and start from the center of the word working out to find out where to place the word on the plank.
Now this frustrates me because it is time consuming and I want to get the words on and start creating.
But patience is a virtue and it pays off in the end.
I use the chalk transfer method to get my words onto the wood. After all my measuring, I flip the paper over on the wrong side and color it all over the back of the words with chalk. I use this blue since I can see it well when the transfere is done.
Then I flip it back over chalk side on my board line up my markings and tape it down so it won't move around on me. Then all ya do is take a pencil and retrace each letter.
And there ya have your beautiful blue letters transfered onto the wood ready for painting
Now it's time to fill in the letters with our color.....I chose black.
I take this awesome Elmer's painter pen in black and go back over my blue outline, this just defines it so much better than my non artsy free hand ability.
Then all ya do is fill it in with your paint color! how fun.
The embellishing can be limitless....let your creativity take over.
I chose to wrap the four corners in jute to give it some more texture.
I strung 3 strands of the jute across the width of the frame and stapled it to the back. This allows for hanging pictures.
For mine I added these sconses I got at restore for 5.00 each to the sides.
For Ashley's I got these cute pieces at Hobby Lobby in the drawer knob section for 4.99..... 2 for the price of one...I love their 50% off sales.
I added these to each side and hung these cute green lanterns with tea lights I got at Ben Franklin Crafts..... both for $2.40 on sale.
are they not just too cute and perfect for a pop of color and some ambiance at night.
Lastly I made two fabric flowers out of muslin and 1 fabric flower out of burlap.
They were hot glued to the top board in a cozy threesome
And now Ashley's finished pallet art picture frame for her home.
here is a look again at the one I have hung in my home
So what are you doing with pallets?
What have you turned into a treasure for your home or loved one?
Please share your love for pallets!!
PS: If you enjoyed reading my tutorial please consider joining Color It Simple.
Thanks for stopping in.
Please check out this fabulous WEBSITE with 35 Creative Ways to recycle Wooden Pallets by DESIGNRULZ
35 Creative Ways To Recycle Wooden Pallets by Designrulz
Until next time, Please check out this fabulous WEBSITE with 35 Creative Ways to recycle Wooden Pallets by DESIGNRULZ
35 Creative Ways To Recycle Wooden Pallets by Designrulz
Linking Up To:


9 Thoughtful Comments:
So clever, Lori! What a great way to display photos! Beautiful job! ;)
A really nice looking project and a well written and documented tutorial ! Thanks for sharing.
I must ask a dopey question though...where do you get your pallets ? I see them lying around everywhere I go, but I'm sure I'll be the one who gets busted if I help myself!
So, what do I think? Well I love it. I have a pallet sitting out in my backyard right now. Really like it and all the special touches,sconces, fabric flowers etc. Really nice job. As always thanks for sharing your creative inspiration at Sunday's Best.
I'm happy you guys like it!! JR The pallets I got were at my hubbys studio by the trash. So I knew we were safe in taking those :) I am forever seeing them beng given away on caigslist for free. Thanks again for the encouraging comments
Fantastic, so funny I did the same exact saying and font on a pallet project last Fall. I love pallet projects and this is fantastic.
Clever and cute...just what you want in a pallet project! What a great way to display lots of pics, too!
Thanks for sharing over at Tip Junkie!
This is a really wonderful project! So much thought & detail went into it, and it was well worth it! Beautiful job!
I think your project turned out so well! I love the pictures hung from the pallet boards....brilliant! Thanks for the inspiration.
blessings,
karianne
I love the finished product! It looks great! I'm following you back!
Post a Comment