Pin It

Showing posts with label before and after. Show all posts

April 19, 2014

Beauty & The Beast " A Stained Art Sideboard Transformation"


So it begins,


A tale of Beauty & The Beast.


                         This once called the BEAST.............


Because it was a monster of a piece of furniture


It weighs Im guessing over 300lbs.....


A dear friend of mine saw it at a goodwill store and bought it for me to refinish.


She said this thing is big and ugly but I feel sure you can transform it.

     
      so I put on my thinking cap.............


Ugly it was and this is how she looked when I started stripping off the top layer of varnish.


She sat in my shop for a while while I decided what in the world to do with it.


I remembered seeing a creative blogger do some sort of stained art


.................................so I went on my search to find the picture to get some inspiration


Bingo The Inspired Room is where I had seen it.


                     I was in Awwwww


I was truly inspired, a great name for her blog.....Thank you Inspired Room!!!!


                        I am no artist, to say the least I was intimidated.


Could I do it?


Would I be able to make a beauty from this beast?


                I had to give it a try...................


determination burned within me like a runner trying to win a race


                  ..................blood, sweat and tears..............


I jumped in............ sink or swim.


After CitraStrip stripper worked it's magic this is what the top looked like


A beautiful piece of hardwood unveiled ..................


The whole piece is wood that is why it is so heavy


Since I am no artist, I began the transformation of the top by printing out a petal design with my cameo silhouette.

Then it took hours to draw out each petal of different sizes into the perfect place.


Excuse the ucky phone pics

I was too focused to run back to the house to get my real camera so I would shoot and move on


This was challenging to say the least, however I was determined so I push on with the staining


Sisters, I had absolutely NO CLUE what I was doing


But.............  I had a vision


So I started with dark stain and in the center of each petal and let it sit for a few mins


                                      .................OK, OK maybe seconds


and tried my best to make a gradient transformation from darker to light


I was so excited to watch each petal grow into a beautiful flower covering the top of the beast


                    Each day she transformed into this beautiful masterpiece.


After I completed all the gradient petal staining I went back with an artist brush with darker stain and a soft cloth


                        Yeah I know Im no artist but I had to try,  I had a vision remember


I would dip the brush in some stain and draw some lines and then diffuse it with my cloth


I was in love with the look.


Once all the petals were as good as it was gonna get,


            I lightly stained over the rest of the top and added a low sheen poly to protect her petal glory


The top was finished.......


And boy did that take a long time

...........cuz I am picky, picky picky


I can say it was not perfect, it was a learning curve


the more petals I did the better they looked ..........I felt a little sorry for the first ones I did ...snicker


However that is the beauty of life nothing is perfect so I accepted her imperfectly beautiful imperfections and moved on.


Next up was the body of the beast now transforming into a beauty


She was boring and plain and heavy.....what to do


I painted it with a creamy off white and lightly layer a color wash over it called cappuccino 


Her doors were boring and plain so I went to hobby lobby and picked up some oh so cute

cast iron door pulls and added them for easy access.

                         
               Along with some molding from Lowe's to trim out the fronts of the doors for a designer look


Lastly I had to add feet to this piece and get her up off the floor.


So another trip to Lowes for some pretty bun feet and she is a PRIZE


so beast here


To Beauty 


So do tell me what you think?


Have you tried your hand at stained art?  if so Im dying to hear from you and see pics


If you have enjoyed this transformation would you consider liking us on Facebook and follow along with google friend connect on my Side Bar


You're the best and thanks for visiting............


parting at

My 1929 Charmer

Transforming Life,

 photo c0a7f9c1-0706-4bd1-8ee9-91308b672bbb.png

August 13, 2013

Repurposed Twin Headboard & Footboard Turned Beautiful Bench


I found this beautiful twin headboard/footboard at  a yard sale last summer.


It was love at first site with all the beautiful details that this headboard has

 I knew exactly what I wanted to do with it.

..............Make a Bench!


yes a bench, my hubby thought I was LoCo.......

here is the picture of the footboard cut in half to make the sides

Being that I had never ask him to help me make a bench before out of a headboard he was unsure of what I was asking at the time


however, I had been dreaming and pinning beautiful headboard transformations onto my Pinterest board.

I knew once I showed him the pictures, he would be able to show me how to build one no problem.


OK, so he did most of the build, however I did help a little


I found some great Tutorials over at My Repurposed Life


off we went on our headboard to bench journey.


  1. The first thing to do when making a (twin) headboard bench is to cut the foot board in half. Using a tape measure, find the center of the footboard and mark. A table saw is the easiest way to cut it in half.
  2. Then on the cut ends, Two holes were drilled on each end section to place in furniture dowels. You can purchase these at HD, Lowe’s, or any home improvement store. Insert the four dowels into the holes on each side of the footboard halves, and then connect the other ends of the dowels into the holes in the side of the headboard panels. I also used some Gorilla Wood Glue for extra hold.
  3. Next we moved to the seat, which we used 2x4's to make a framed box and added stained repurposed wood for the seat planks. Some L Brackets, wood glue and nails hold it all together nicely.
  4. Next sand all the pieces well to rough it up for painting, unless however you like the chippy look.  The paint will tend to chip off of any glossy areas.  You can use a mid-grade grit (100) for this to rough up the glossy paint for adhesion
  5.  Next step is to prime …….If you want a flawless finish you will want to prime here …. I did not so I skipped the prime step.
  6. I painted it a creamy yellow, it was a custom color I mixed together. 
  7. Distressed it, antiqued it with a special walnut stain all over. 
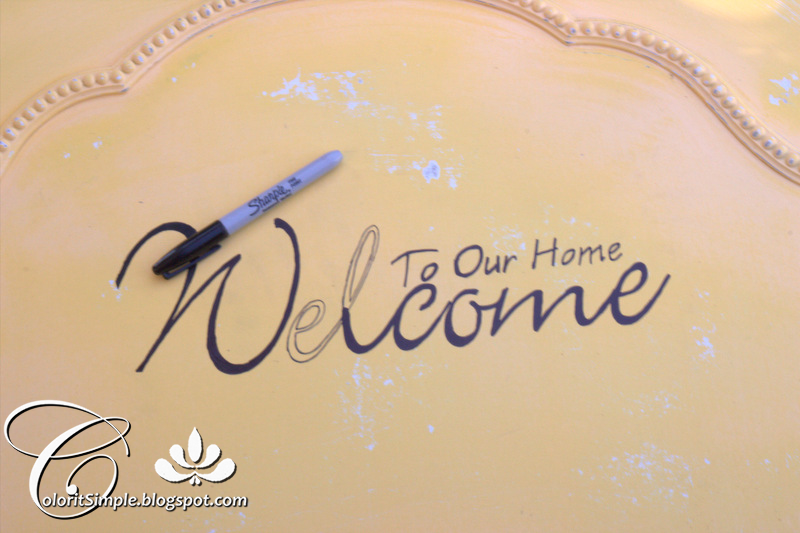
  8. For the back of the headboard I added Welcome to our home and gave it a turquoise patina/glaze with a polly to finish it off. 
  9. We added an apron to the front by matching up a piece of wood to the headboard and tracing the curvature of the top and cutting out with a jigsaw. Stained it and nailed it on to the seat front.
  10. After she was all finished I decided a lower shelf for storage would be a great addition.


Love the details.......


I have 3 other headboards now sitting in my now almost finished Shop to repurpose.  I got all of them off the side of the road :)


So what do you think of my headboard turned bench?

How have you repurposed a headboard?

Hugs to all my followers.

Until next time,
Photobucket

April 2, 2013

Roadside Rescue Dresser Turned Entertainment Stand


Have you ever been on your way somewhere and you spot a discarded piece of treasure on the side of the road?

Then you have to rush home and figure out how you're going to ask your loving hubby to take the truck and make a trip to grab it before some other DIY'er nabs it?

Well that is what happened....

He said seriously honey, not again......dont you have enough projects going on?

He graciously agreed and off we went.

All he could say as we were loading it is babe, this is a piece of garbage.

I said It may be a laminate top but I would not call it garbage......just help me load it.


So he did and off we went with a big smile on my face!!

As you can see it was missing all the drawers except for two and I put those on the bottom.


The dresser was not solid wood

but that is OK I saw some potential and I had never painted a laminate piece before so I wanted to dig in and get some practice.


 I took my favorite tool, my sander and sanded all the laminate until it was dull.

I have read that laminate has to be primed so out with the primer.


I wanted a grey undertone since I wanted to paint it barn red and have some grey color showing through after I distressed it.

So I added some black acrylic paint to the primer to turn it grey.


Here she is with the first coat of primer........


Now the second coat of primer just to make sure the laminate is good and covered


after a light sanding .....

it was time for a purdy coat of barn red paint


Once I had the two coast of red paint on

 I lightly sanded..........


I love the way glazing on furniture looks

It gives it a rich antique look

It makes the color pop as well


I chose to Mod-Podge a cool woodsy turquoise paneling scrapbook paper onto the backboard of the dresser/entertainment center.

This is not easy to do for someone who likes things perfect......

because when the paper gets wet those of you that have done this know exactly what I am getting ready to say.

it wrinkles and bubbles up............

you have to be be patient and work it and work it to get out the bubbles and wrinkles.

I have learned to get the worst out and the rest will usually take care of itself once it dries.


I distressed it with some sandpaper so some of the grey would show through.

The inside walls were painted a pretty turquoise color to match the scrapbook paper I put on the back.


I ask my wonderful hubby to cut me some pallet boards down so we could make rustic shelving to replace the missing drawers.

I Love me some pallets that you can get free at so many places.

These come in handy when you need some rustic wood.


I stained and added a semi-gloss poly on them to bring out the grain of the wood.

can you say beautiful!!

All the sliders were removed of course from the side walls when I paint the the yummy turquoise color.


I used the original hardware and spray painted them a color that contrasted with the inside of the dresser/entertainment center.


With a little hard-work and creativity this roadside find turned out beautiful.


My girlfriend Kaye moved into her new home and I gave this to her as a housewarming gift.

She loves it!!


She has it in her living room with her TV on top and all her goodies nestled inside this warm trash turned to treasure.


What have you rescued from the side of the road lately?


Until next time,
Photobucket

Photography

Shoot Fly Shoot